Loud & Clear: Top Limiter Plugin Tips for Mastering Music
When mastering a song, why are limiters applied? What's the best way to limit effectively and tastefully? And, if we use too much, how do we know?

What does mastering music involve?
Mastering music is the final polish and preparation stage for a recorded and mixed track to go through before distribution. EQ, compression and stereo enhancement are some of the essential steps that need to be taken to ensure music sounds balanced, consistent, and professional across different playback systems. Applying a limiter after all those stages is where we manage and finalize dynamics and improve loudness when mastering music.
In this article, we'll give all music makers essential advice on how to get started with limiters and how to get the most from them when mastering music. When you’ve soaked up all the information you need from this article, you can further your mastering knowledge by checking out our video How to Set Loudness Levels for Streaming. This video will help you learn how to achieve specific loudness targets for all major streaming platforms such as Apple Music, Spotify and more require.
In a nutshell, what is limiting?
Limiting is the absolute final process when mastering music and is arguably one of the most critical steps to get right. A limiter's job is to make music as loud as possible. It does this by increasing perceived loudness, but it does this without clipping, distorting or destroying the clarity of the mix in any way. Limiters are easy to use, but easy to abuse when you don't want your volume levels going into the "red".
Let's first look at what a limiter technically is and what unwanted audible effects it prevents.
How to use a limiter when mastering music

A limiter is essentially a super-fast sounding compressor set with an extremely high ratio.
Belonging to the dynamics family of audio processors, both limiters and compressors are designed to reduce (attenuate) strong transients (loud peaks), but limiters go about their processing with much more power and ease of use.
In a limiter, the amount of gain reduction you get is determined by the Output Ceiling control. A value assigned to this determines the 'limit' point at which any level passing through cannot exceed - why is this important?
When mastering music, one of our key responsibilities is to make sure the music never clips. This is where a limiter’s unique qualities come into play.
Before we dive deeper, what happens to audio If clipping occurs? What signs should I keep my eyes open for?
First, you will notice that the master output meter in your session light up with red peek indicators. These will often freeze bright red in your DAW to draw your attention to the issue. Backing off the level within a waveform or at a fader will sort this, after which you can click those red peek indicators to clear the warning.

Second, the final printed waveform will look squared off around the peaks. Again, clipping has happened because signal has exceeded 0dB.

The third sign is an audible penalty, which is the worst. If your music has clipped, it usually sounds harsh, with digital artifacts throughout, usually heard most noticeably in the loudest parts. As a result of clipping, your music will lose essential clarity and impact, making it hard for listeners to enjoy.
The audio example below demonstrates the effects of clipping and how it impacts the overall listening experience. The example starts clean, followed by the clipped version.
- 0:00 /
- Clipped master example
Obviously, clipping is something we as passionate music-makers want to avoid at all costs but in the same effort we want our mastered music to sound louder than the mix and also be competitively loud against other commercial releases. There is a balancing act to be done here – Using a limiter to get the loudness you need while preserving the music's dynamic integrity. More on that later. Let’s dive a little deeper into how to use a limiter’s controls.
Many limiter plugins are called “peak” or “brick wall” limiters – Think nothing shall pass this exact point which is a vital tool when mastering music. The limiters that do this best are the ones you barely hear working... that is if you’re not driving them too hard with extreme level boosts.
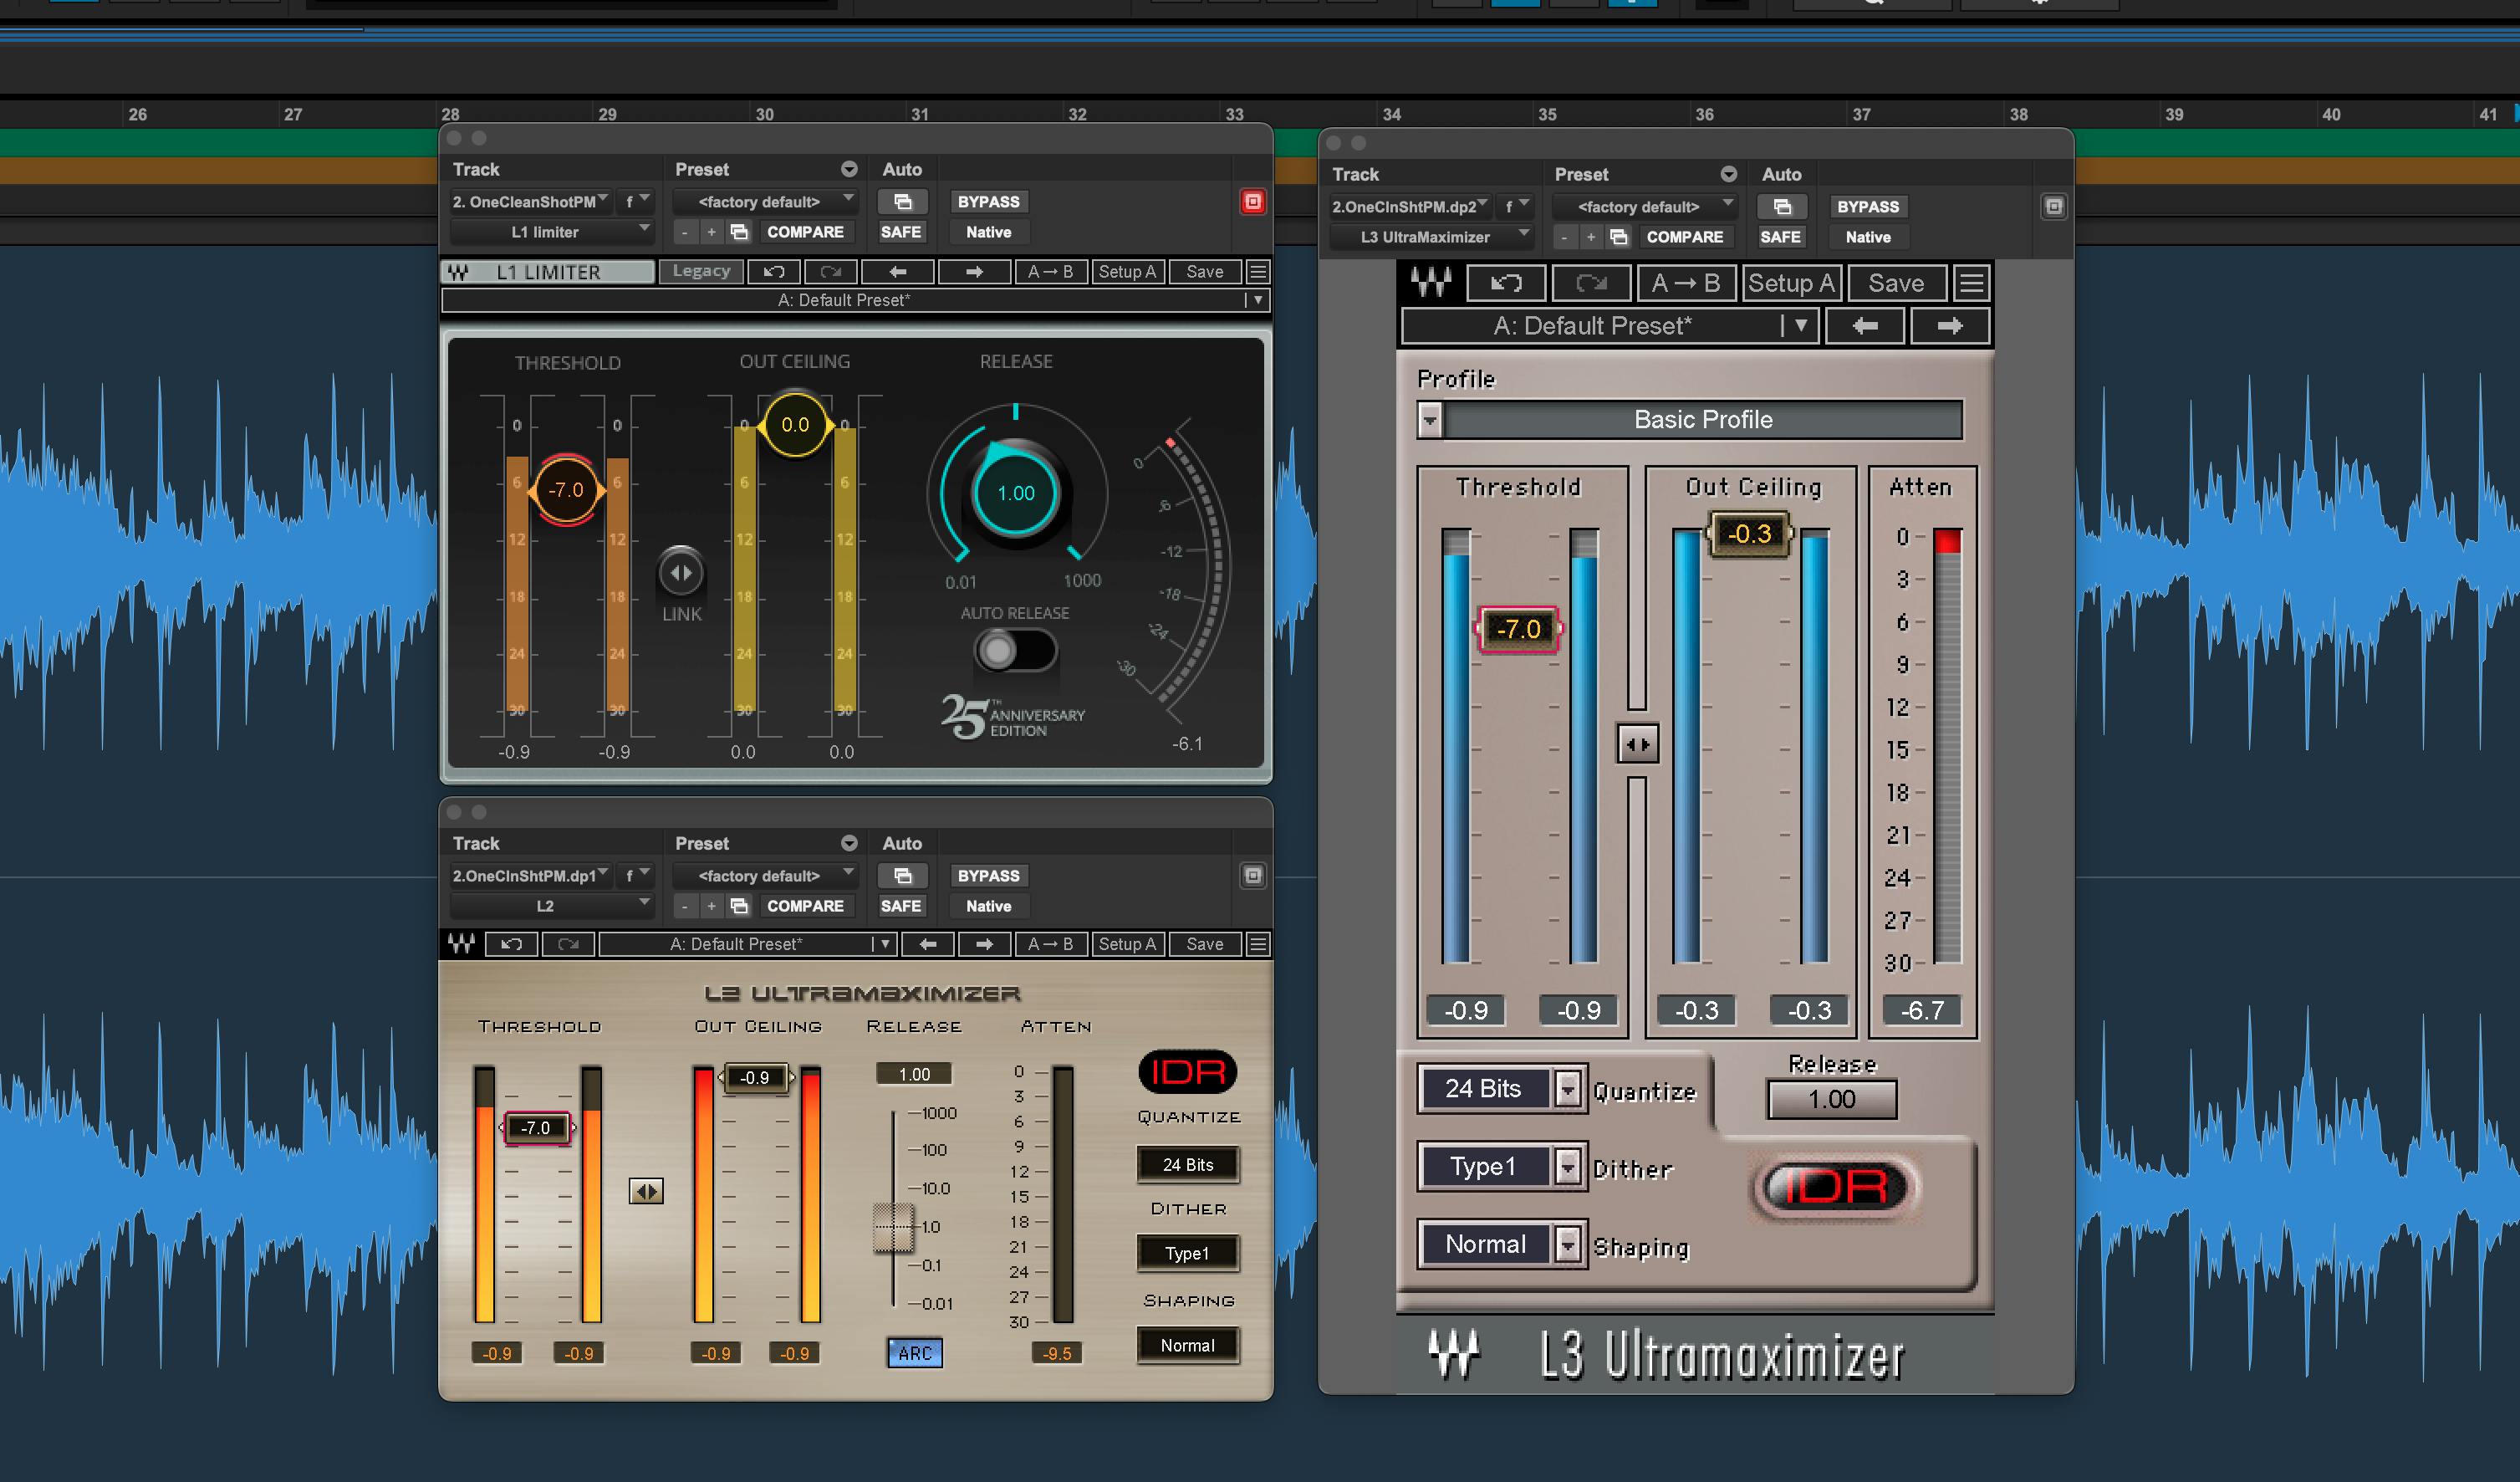
Our L2 Ultramaximizer and L3 Series are two of the most renowned limiters in this class. These were designed specifically for mastering and provide beautifully transparent results for any genre of music. We recommend these two plugins if you need a limiter that doesn't make your mix sound obviously limited, colored or over compressed.
Watch the video below to hear the differences between L1, L2 and L3, our three most popular limiter plugins.
As you have probably noticed by now, limiters are generally much simpler to use than compressors. Almost every limiter plugin on the market has at least the same three parameters: Threshold, Release, and Output Ceiling. Occasionally, you may find a more advanced setting, such as Attack or behaviour, but if you're just getting started with mixing and mastering, we recommend taking the time to familiarize yourself with just the three main controls we just mentioned.
How to use the controls in a limiter plugin?
Such as it would in a compressor, the Threshold values determine when processing starts. In a limiter, the Threshold is the point where limiting begins.
The Output Ceiling specifies how much limiting is applied. When the Threshold is low, even relatively low-level signals will undergo gain reduction, while a high Threshold will yield a more measured response. Regardless of the Threshold, lowering the output ceiling always causes more gain reduction.

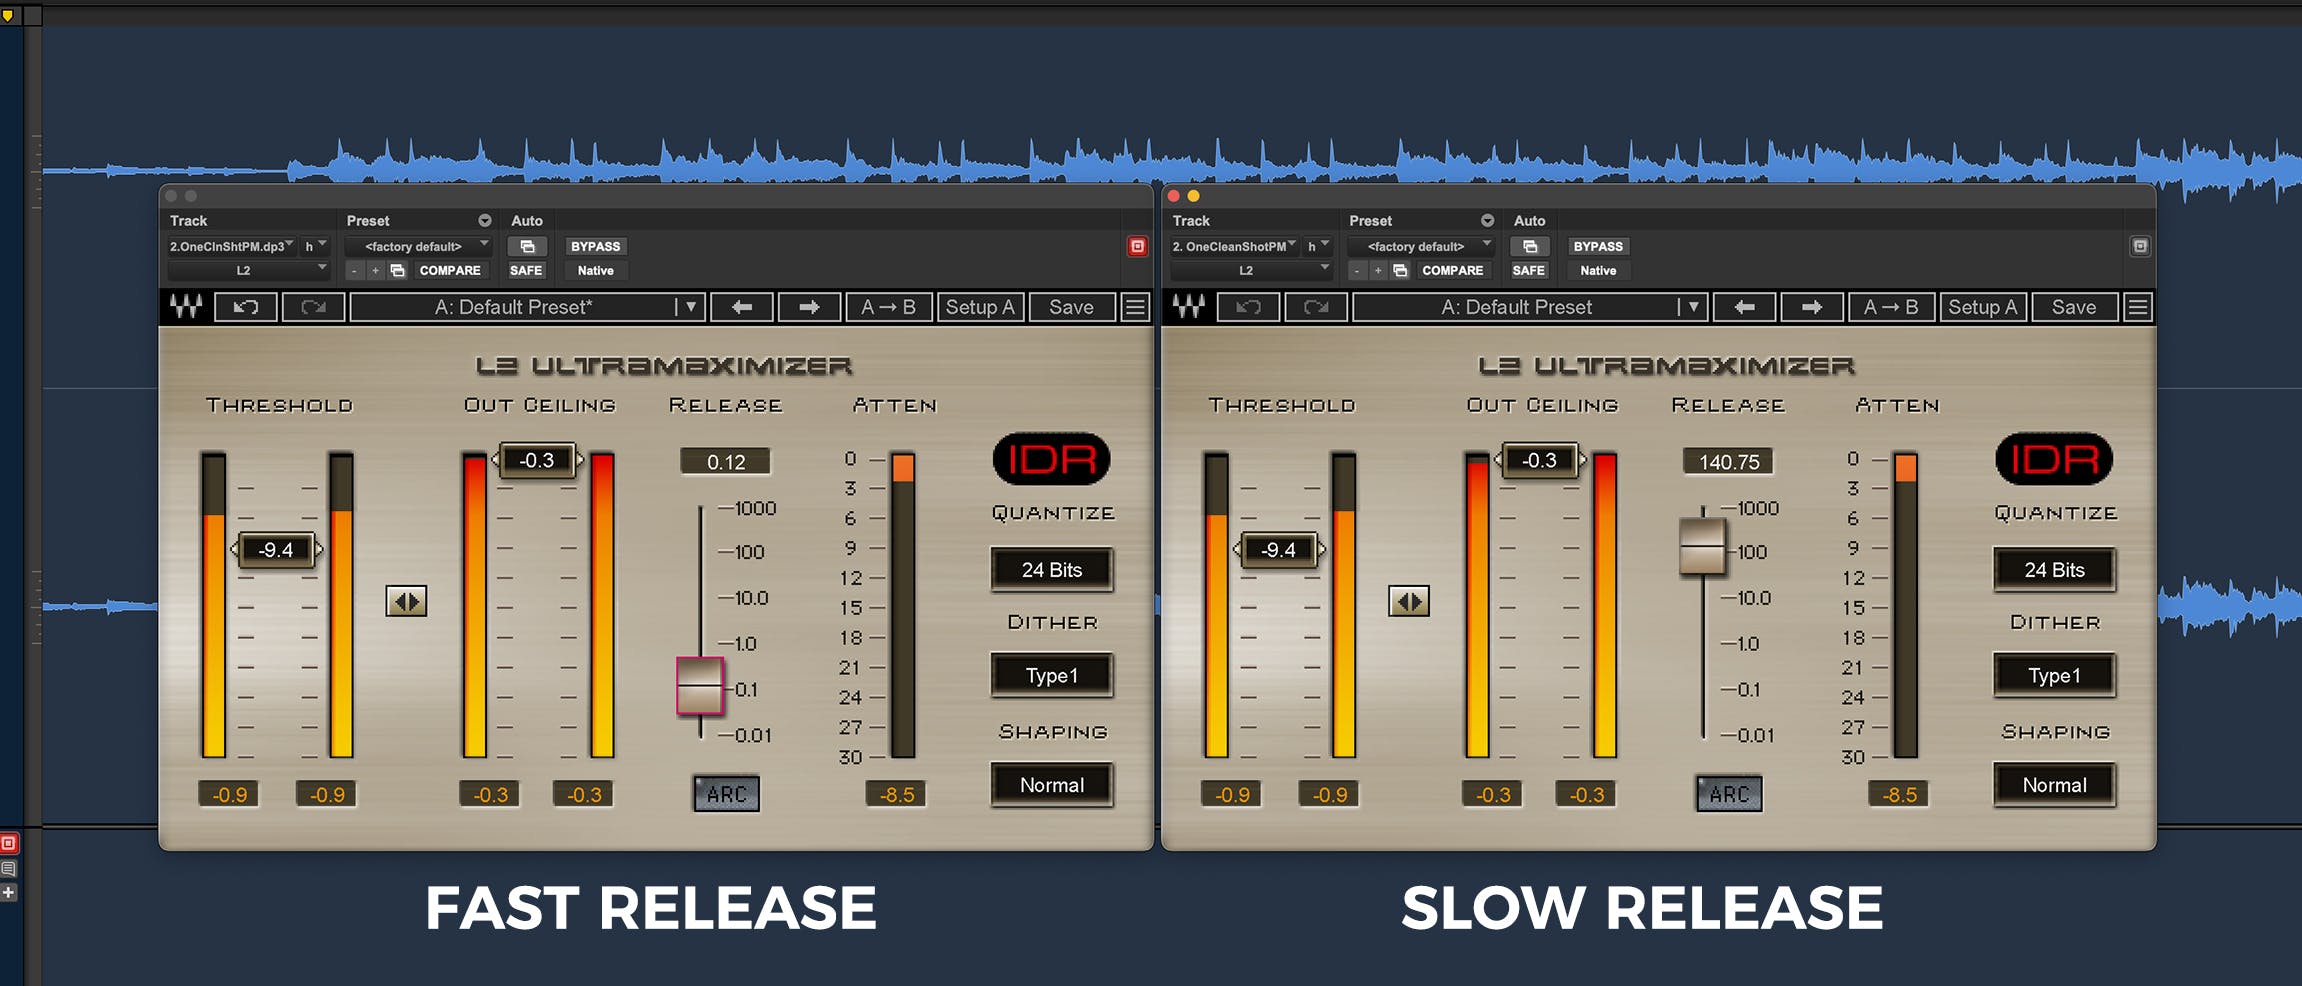
The Release control determines how quickly the limiter stops working after the signal drops back down below the Threshold. If it is set too long (slow), you will hear an audible pumping in your music. If it is set too short (fast), distortion artifacts may result.
Many limiters provide a handy Auto-release IRC (Intelligent Release Control) option. In Waves limiters this is called ARC. This sets the optimum release time for your music based on its waveform activity. It’s a simple set it and forget it button push. In many instances this will provide the best results but if you do want to get under the hood, play around with the Release timings on a specific looped section of a song. Start with a fast release time. Listen how this value influences the vibe of your music, then, switch to a super slow release. Compare the differences and set to taste. This is how you discover what works best for your music.
Get loud masters - How to dial in a perfect amount of limiting in a master
As with every other mastering music process, when it comes to limiting, less is more as more is rarely enough. In most cases, pushing a limiter too hard can lead to disappointing results, ruining the deep emotive qualities that you've worked so hard to incorporate in your music.
It’s clear to see why over limiting is easy to do but sadly it comes at the cost of attack and punchiness. Drum and percussion tracks sounding squashed are often the first sign that too much limiting is applied. Yes, you may get a "loud" master, but is it worth sacrificing punchiness for a louder master? Remember, limiting is a much more aggressive form of dynamic control than compressing and is therefore capable of doing way more damage.
To eke out a little more gain and perceived loudness from your music, you should first complement your master with light limiting, gradually adding more gain and perceived loudness without sapping its life, energy, and excitement.
The audio example below will give you a good idea of how overusing limiting ruins punch. The first half of the example is clean followed by over limiting. Notice how most of the subtleties are pushed forward into the space where most of the impactful elements are. Notice also how the mix pumps.
- 0:00 /
- Mastering music with too much limiting
Now that we've covered some essential theory, let's move on to using limiters in a clean way.
How to get loud and clear limiting when mastering music
First of all, limiters should always be the last plugin in any chain of plugins. Remember they also act as your master output’s safety net. If you were to put a processing plugin after a limiter, chances are this addition would introduce some extra gain which would clip your music.
Start by setting the Output Ceiling to -0.2 or -0.1 dBFS. It’s best to never leave this set to 0.0, or inter sample peaks could sneak through resulting in some distortion being heard when listening back to your master through a consumer playback device.
Next, set a very low Threshold level of around -0.5 or so. This should result in a gain reduction of about 2 to 4 dB, which is as high as you want to go in most instances. Any more than that and you’ll likely end up with sonic artifacts which aren’t worth the extra level you’re gaining. When set correctly, your limiter should kick in only when things get out of hand yet ensure that no clipping occurs.
In this tutorial you’ll see an example of the L2 Ultramaximizer being used to master your music for online streaming: (The L2 comes into play at 11:26)
Advanced Limiters in mixing and mastering - When to use a limiter in
In the same way that multiband compressors are available, modern mastering tools also make it possible to apply limiting in a multiband workflow as well.
Limiters such as the L3 Multimaximizer and the L3-16 Multimaximizer are great plugins of this type that let you really target specific tasks in your master. With the multiple frequency bands on offer (five in the case of the L3 Multimaximizer, a whopping 16 in the case of the L3-16) you have all the control you need but these do not consist of independent limiters operating separately in each band; instead, they have one central peak limiter which examines the signals of all of the input bands and then calculates optimal attenuation for each band, applying automatic gain reduction so that the mixed result is custom-limited to fit the music.

As mastering engineer Yoad Nevo explains “You set the Threshold, which determines how much the overall gain is increased, the L3 then tries to make the least audible change to each band to provide the required gain change. It will automatically limit the most in the bands where the most energy is. This generally should be no more than 2 dB or so, but you can override this by telling it to do more limiting in an adjacent band – for example, you can limit the low end more in order to preserve more of the dynamics in the low-mid band, where the bass and some of the guitars are. The correct use of the L3 adds a great deal more loudness to the track without fundamentally altering the dynamics or balance.”
Some mastering engineers even use multiple instances when limiting a mix. Nevo sometimes starts out with an L2 to boost the level slightly before routing the signal to an L3. “Because the L2 is wideband,” he says, “it applies limiting to the whole frequency range. But the L3 allows me to control the different frequencies in a less dynamic way. Because of the L2, the kick, the snare, and the vocal are all tighter together, so in the L3 I can structure the low frequencies and the midrange a little more finely so that it mainly just limits the kick drum.”
In this in-depth mastering webinar with Nevo, you can see his L2 and L3 chain in action as part of his entire mastering process:
Of course, this is a technique you can try for yourself if you feel you need something a little more advanced when mastering.
What's the best way to hear if my limiter is doing too much when mastering music?
You’ve probably heard of the so-called “Loudness Wars” - the seemingly never-ending battle to master music as loud as possible with little regard for consequences. Our advice: Disengage, the world moved on years ago!
The fact of the matter is that louder signals are not better. Yes, the typical response to an increase in loudness is usually positive – we tend to turn the music up when a favorite song comes on but over time, relentlessly loud music can cause listening fatigue to the point of becoming unbearable.
When you start applying limiting, you may first feel you improved things by increasing the apparent loudness, but you have sucked all the life out of the track in doing so.
Luckily, there’s a super simple way to avoid tricking your brain into thinking louder is better when adjusting Out Ceiling and Threshold controls that you should always be doing with these plugins.
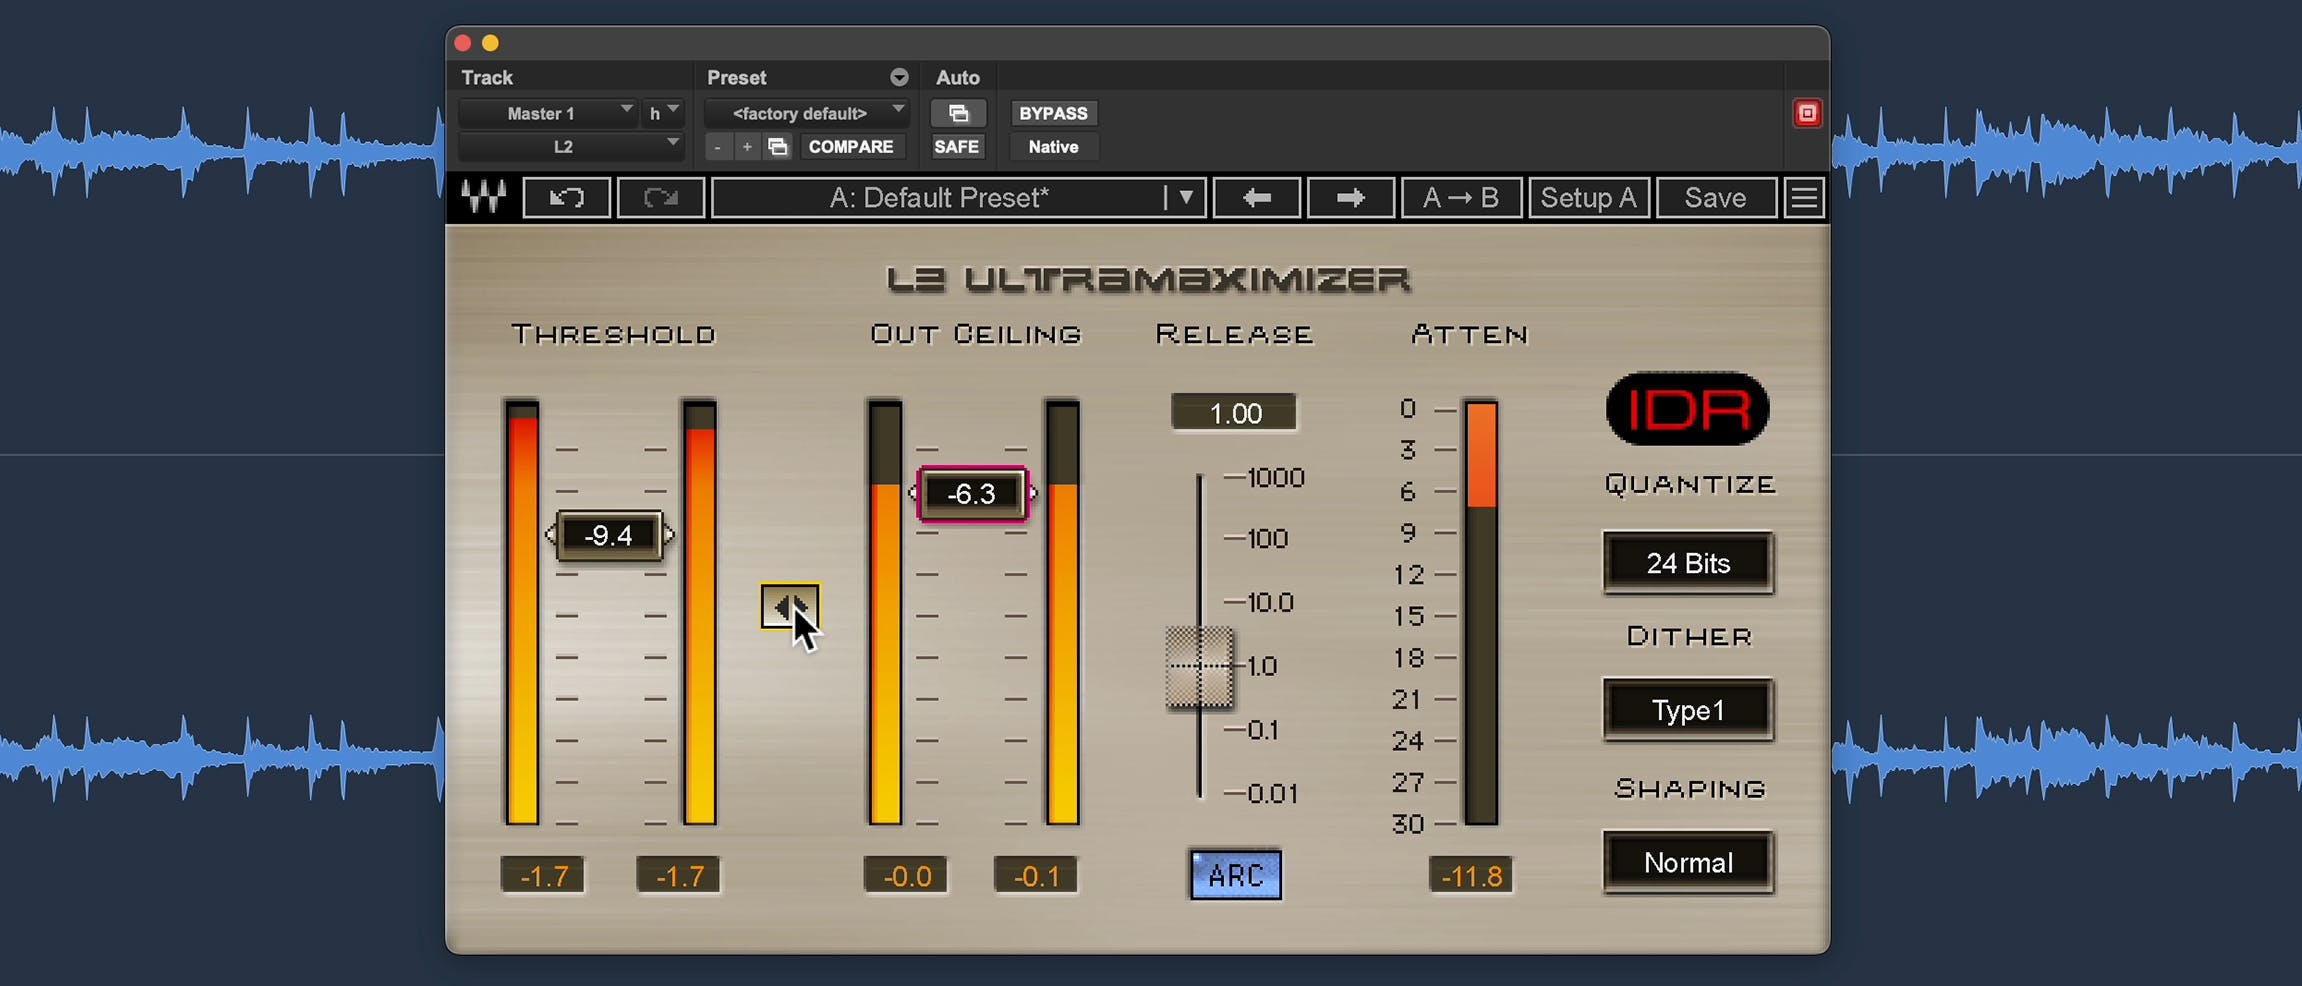
In our L series of Limiters, there’s a Link control between the Threshold and Ceiling faders. Use this to bring both controls down together. This in turn compensates for the level difference. Your ears will be able to focus purely on the effects of limiting instead of the level and loudness of it.

When you feel you’ve set your limiter up as transparently as possible you can return the Out Ceiling to the -0.3dB range, thus getting that uncompressed sounding loud master you know sounds crystal clear with punch and energy.
Now that we’ve covered all the essential steps you need to know about where limiters need to be inserted, when and how to get limiting working well for you when mastering music, let’s cover one final point that helps music makers get the loudness of their music within the ballpark of other commercially released music.
Should I reference my masters against other music?
“Referencing” is a fancy term that just means “keep comparing”. Compare your master to the original mix (at equal loudness!) to ascertain what you’ve gained (or lost). Then, once you’ve satisfied yourself that the benefits have outweighed the liabilities, listen to your master on a variety of playback systems to make sure that it translates as universally as possible.

Finally, compare it to commercially released recordings of music in a similar genre. (If the music you’re mastering is mellow, there’s no point in comparing it to thrash metal!)
If you’re mastering multiple tracks for the same album or compilation, this becomes even more critical. “Listen to all the tracks back-to-back, focusing mainly on the vocal,” suggests Nevo. “Be sure to check all tracks on different speakers and at different monitoring levels. If you hear level disparities between the tracks, nudge the levels on your limiter plugin until they are as even as possible.”
Armed with this mastering limiter insight, don’t forget to also check out our video How to Set Loudness Levels for Streaming to learn how to get your tracks hitting specific loudness targets streaming platforms such as Apple Music, Spotify and more require when mastering music.
Get a mastered track taster - Hear what pro mastering sounds like on your music with compression, EQ, stereo imaging and loudness sorted for you
We hope these pointers gave you that extra layer of knowledge and confidence to help you decide when to use a limiter and how to get loud masters without any drawbacks. Mastering is regarded as a dark art made up many subtle stages, Limiting is one of them.
If you want to learn more skills to help you get your masters sounding pro, then check out our other free mastering tutorials. Or, to learn how a professional master should sound, which is half the battle when mastering music, try out our Online Mastering Service for free.

Simply sign up for free or login with your Waves user account, drag and drop your mix into the browser and choose how you want your master to feel. It’s that simple!
To get fantastic release ready results in minutes, The Waves Online Mastering platform makes it incredibly easy for you to take full advantage of our powerful AI technology and processing. The AI listens and analyzes the sonic profile of your music, giving you a powerful yet straightforward selection of tonal options to choose from to get your masters finalised exactly how you need them.
First published in 2017, we have since updated this article to provide you with the knowledge and advice relevant for today’s mastering music maker needs.


